
搜索到
8
篇与
的结果
-
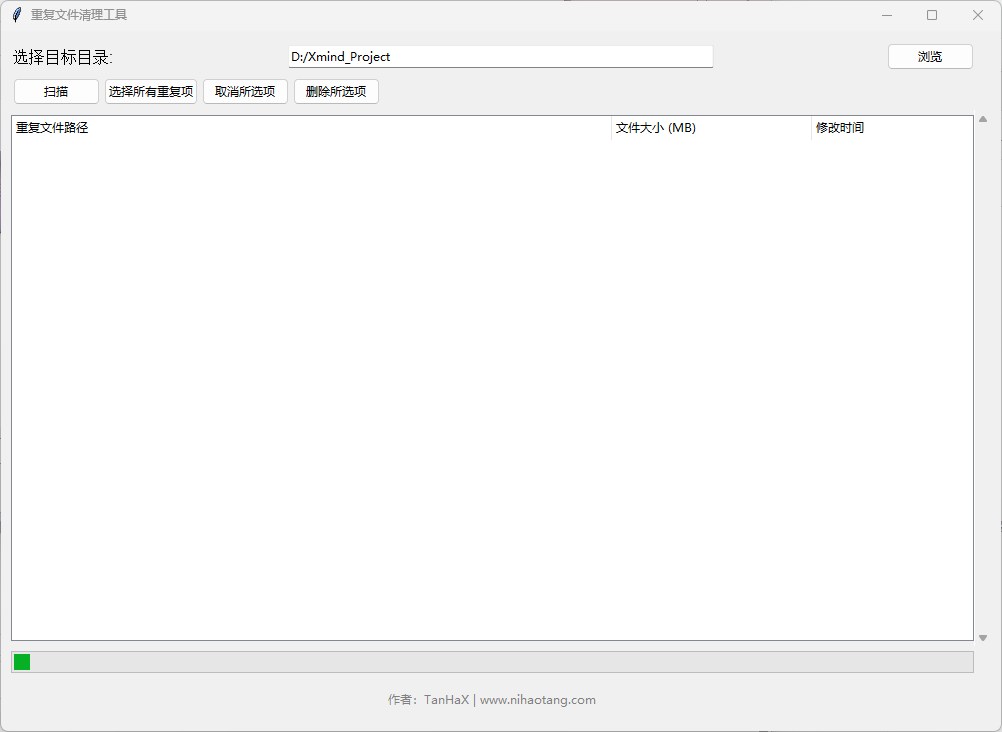
 重复文件清理工具 重复文件清理工具 - 高效管理你的数字资产工具简介这款基于Python开发的桌面应用程序能智能扫描指定目录,通过MD5哈希校验精准识别重复文件,帮助用户快速释放存储空间。支持可视化操作、自动备份和详细日志记录,是管理数字资产的得力助手。功能亮点✅ 智能识别系统双重校验机制(文件大小+MD5哈希)支持全格式文件检测自动排除首份原始文件🚀 高效操作体验多线程扫描不卡顿可视化进度提示即时结果显示排序🛡️ 安全删除机制自动创建带时间戳的备份目录生成Excel格式操作日志可恢复式文件迁移使用指南1. 快速入门1. 点击"浏览"选择目标目录 2. 点击"扫描"启动检测 3. 使用复选框选择要清理的文件 4. 确认删除并自动备份2. 核心功能详解智能分组策略# 哈希计算核心代码 def calculate_hash(self, filepath): hasher = hashlib.md5() with open(filepath, 'rb') as f: while chunk := f.read(8192): hasher.update(chunk) return hasher.hexdigest()采用8KB分块读取大文件MD5+文件大小双重校验自动保留最早版本文件可视化操作界面三栏信息展示(路径/大小/修改时间)斑马纹交替背景色支持多选/全选/反选3. 安全删除流程创建backup_YYYYMMDD_HHMMSS目录迁移文件而非直接删除生成包含元数据的Excel报告自动打开备份目录验证技术实现架构设计graph TD A[GUI界面] --> B[目录选择] A --> C[扫描控制] C --> D[多线程引擎] D --> E[哈希计算] E --> F[重复比对] F --> G[结果渲染] G --> H[删除处理] H --> I[备份系统]关键技术Tkinter框架:原生UI组件构建多线程处理:防止界面冻结Pandas报表:结构化数据存储哈希优化:分块读取大文件使用场景摄影师整理RAW格式原片开发者清理IDE缓存文件办公族整理重复文档自媒体管理素材库注意事项⚠️ 系统文件目录慎用 ⚠️ 建议保留至少2个备份副本 ⚠️ 固态硬盘删除文件难以恢复 ⚠️ 首次使用建议在小目录测试开源信息作者: TanHaX 技术栈: Python 3.9+ / Tkinter / Pandas 许可证: MIT Open Source 项目地址: www.nihaotang.com定期清理重复文件可提升系统性能,建议每月执行一次维护操作。本工具特别适合需要处理大量重复素材的内容创作者和开发人员。立即下载最新版本👇{cloud title="重复文件清理工具" type="lz" url="https://smilingth.lanzoum.com/iINWD2r600lc" password="4xc7"/}
 -
Python 扫描局域网存活设备 大无语了临近考试还在这里本末倒置的瞎搞!写这个没有什么技术含量的小工具,望各位大佬多担待一下。最近朋友的出租屋的网络出现多个DHCP服务器, 路由器有时候动态获取错误地址,所以使用 Python 编写了这个简单小工具以便了解局域网中哪些 IP 地址正在被使用和其主机名和MAC地址等信息(获取主机名和MAC还有点问题)。目前计划这个扫描工具实现以下功能:{timeline}{timeline-item color="#19be6b"}手动设置或者自动获取本地IP信息;{/timeline-item}{timeline-item color="#19be6b"}对指定或自动生成的子网内所有主机进行扫描,判断主机是否存活,并提取主机名、MAC地址和在线状态;{/timeline-item}{timeline-item color="#ed4014"}检测存活主机的端口使用状态;{/timeline-item}{timeline-item color="#ed4014"}手动设置检测超时时间;{/timeline-item}{timeline-item color="#ed4014"}手动设置线程;{/timeline-item}{/timeline}{lamp/}import ipaddress import socket import subprocess def scan_local_network(subnet=None): if subnet is None: local_ip = socket.gethostbyname(socket.gethostname()) subnet = ipaddress.ip_network(local_ip+'/24', strict=False) live_hosts = [] total_hosts = sum(1 for _ in subnet.hosts()) scanned_hosts = 0 for host in subnet.hosts(): scanned_hosts += 1 host = str(host) ping_process = subprocess.Popen(['ping', '-n', '1', '-w', '100', host], stdout=subprocess.PIPE, stderr=subprocess.PIPE) ping_output, _ = ping_process.communicate() if "TTL=" in ping_output.decode('gbk'): live_hosts.append((host, ping_output.decode('gbk'))) print(f"扫描进度:{scanned_hosts}/{total_hosts}", end='\r') return live_hosts def parse_ping_output(output): result = { "hostname": "", "mac_address": "", "status": "Offline" } # 提取主机名 for line in output.splitlines(): if line.startswith("Reply from"): hostname = line.split(" ")[2] result["hostname"] = hostname.replace(":", "") break # 提取 MAC 地址 for line in output.splitlines(): if line.startswith("MAC Address"): mac_address = line.split(":")[1].strip() result["mac_address"] = mac_address break # 判断端口状态 if "unreachable" not in output: result["status"] = "Online" return result def main(): # ASCII ascii_art = """ .--, .--, ( ( \.---./ ) ) '.__/o o\__.' {= ^ =} > - < / \\ // \\\\ //| . |\\\\ "'\ /'"_.-~^`'-. \ _ /--' ` ___)( )(___ (((__) (__))) ............................................. ping值稳定测精准 TanHaX 网络通畅似流云舒。 """ print(ascii_art) print("欢迎使用局域网IP扫描工具!") subnet = input("请输入要扫描的网段(例如 192.168.1.0/24),或 按回车键默认使用本地网段:") if subnet: try: subnet = ipaddress.ip_network(subnet, strict=False) live_hosts = scan_local_network(subnet) except ValueError: print("输入的网段格式不正确!") else: live_hosts = scan_local_network() if live_hosts: print("\n以下IP地址在使用中:") for host, output in live_hosts: parsed_data = parse_ping_output(output) print(f"[IP] {host} [Hostname] {parsed_data['hostname']} [MAC] {parsed_data['mac_address']} [Status] {parsed_data['status']}") print("扫描完成!") else: print("未发现任何活跃的主机。") if __name__ == "__main__": main()
-
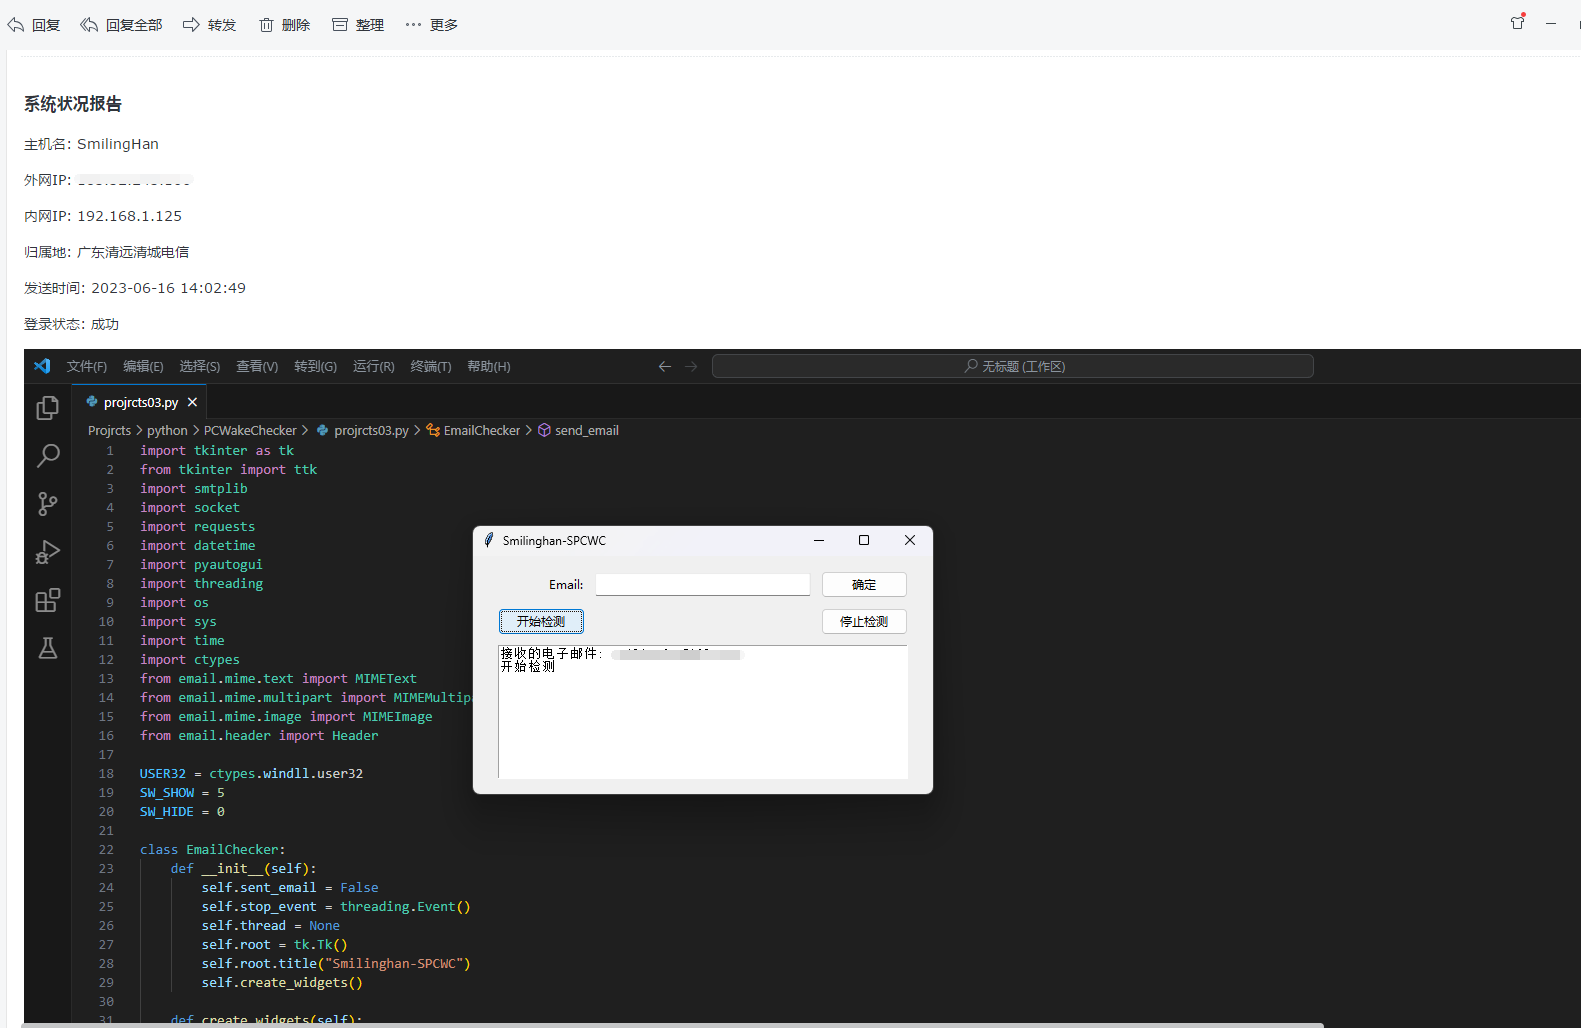
TanHaX-SPCWC 刚考完试闲得发慌写的。Smilinghan-SPCWC 是一个 Python 程序,允许用户监控计算机的系统状态并发送电子邮件通知。该程序使用 tkinter 库创建图形用户界面 (GUI),使用 smtplib 库发送电子邮件。还使用了其他库,如 socket、requests、datetime、pyautogui、threading、os、sys、time 和 ctypes。import tkinter as tk from tkinter import ttk import smtplib import socket import requests import datetime import pyautogui import threading import os import sys import time import ctypes from email.mime.text import MIMEText from email.mime.multipart import MIMEMultipart from email.mime.image import MIMEImage from email.header import Header USER32 = ctypes.windll.user32 SW_SHOW = 5 SW_HIDE = 0 class EmailChecker: def __init__(self): self.sent_email = False self.stop_event = threading.Event() self.thread = None self.root = tk.Tk() self.root.title("TanHaX-SPCWC") self.create_widgets() def create_widgets(self): mainframe = ttk.Frame(self.root, padding="20 10 20 10") mainframe.grid(column=0, row=0, sticky=(tk.N, tk.W, tk.E, tk.S)) mainframe.columnconfigure(0, weight=1) mainframe.rowconfigure(0, weight=1) email_entry = ttk.Entry(mainframe, width=30) email_entry.grid(column=1, row=0, sticky=(tk.W, tk.E)) email_label = ttk.Label(mainframe, text="Email:") email_label.grid(column=0, row=0, sticky=tk.E) submit_button = ttk.Button(mainframe, text="确定", command=lambda: self.submit_email(email_entry)) submit_button.grid(column=2, row=0, sticky=tk.W) start_button = ttk.Button(mainframe, text="开始检测", command=self.start_thread) start_button.grid(column=0, row=2, sticky=tk.W) stop_button = ttk.Button(mainframe, text="停止检测", command=self.stop_thread) stop_button.grid(column=2, row=2, sticky=tk.E) output_text = tk.Text(mainframe, height=10, width=50) output_text.grid(column=0, row=3, columnspan=3, sticky=(tk.W, tk.E)) for child in mainframe.winfo_children(): child.grid_configure(padx=5, pady=5) email_entry.focus() self.root.bind('<Return>', lambda event: self.submit_email(email_entry)) self.output_text = output_text def submit_email(self, email_entry): email = email_entry.get() self.output_text.insert(tk.END, "接收的电子邮件: " + email + "\n") with open("emails.txt", "w") as f: f.write(email + "\n") email_entry.delete(0, tk.END) email_entry.insert(0, "") def send_email(self, subject, content, receiver): sender = 'smilinghan@qq.com' password = 'password' with open("emails.txt", "r") as f: receivers = [f.read().strip()] message = MIMEMultipart() message['Subject'] = Header(subject, 'utf-8') message['From'] = Header(sender) message['To'] = Header(receiver) text = MIMEText(content, 'html', 'utf-8') message.attach(text) screenshot = pyautogui.screenshot() if screenshot is not None: screenshot.save('screenshot.png') with open('screenshot.png', 'rb') as f: img = MIMEImage(f.read()) img.add_header('Content-ID', '<screenshot>') message.attach(img) try: smtpObj = smtplib.SMTP_SSL('smtp.qq.com', 465) smtpObj.login(sender, password) smtpObj.sendmail(sender, receivers, message.as_string()) self.output_text.insert(tk.END, "邮件发送成功\n") self.sent_email = True except Exception as e: self.output_text.insert(tk.END, "邮件发送失败\n") self.output_text.insert(tk.END, str(e) + "\n") self.sent_email = False def check_system(self, receiver): try: while not self.stop_event.is_set(): if USER32.GetForegroundWindow() != 0: hostname = socket.gethostname() ip_address = socket.gethostbyname(hostname) response_ip = requests.get("https://www.90th.cn/api/ip") if response_ip.status_code == 200: public_ip = response_ip.json()["ip"] address = response_ip.json()["address"] else: public_ip = "获取失败" address = "获取失败" login_time = datetime.datetime.now().strftime("%Y-%m-%d %H:%M:%S") subject = '系统状况报告' content = f""" <html> <body> <h3>系统状况报告</h3> <p>主机名: {hostname}</p> <p>外网IP: {public_ip}</p> <p>内网IP: {ip_address}</p> <p>归属地: {address}</p> <p>发送时间: {login_time}</p> <p>登录状态: 成功</p> <p><img src="cid:screenshot"></p> </body> </html> """ if not self.sent_email: self.send_email(subject, content, receiver) self.sent_email = True time.sleep(5) else: time.sleep(1) self.sent_email = False self.output_text.insert(tk.END, "电脑未唤醒\n") except Exception as e: self.output_text.insert(tk.END, "Error: 无法检测电脑唤醒状态\n") self.output_text.insert(tk.END, str(e) + "\n") self.sent_email = False def start_thread(self): if self.thread is None or not self.thread.is_alive(): with open("emails.txt", "r") as f: receiver = f.read().strip() self.thread = threading.Thread(target=self.check_system, args=(receiver,), daemon=True) self.thread.start() self.output_text.insert(tk.END, "开始检测\n") def stop_thread(self): if self.thread is not None and self.thread.is_alive(): self.stop_event.set() self.thread.join(timeout=3) self.output_text.insert(tk.END, "停止检测\n") def run(self): if getattr(sys, 'frozen', False): os.chdir(sys._MEIPASS) self.root.protocol("WM_DELETE_WINDOW", self.stop_check) self.root.mainloop() def stop_check(self): if not self.stop_event.is_set(): self.stop_event.set() if self.thread is not None and self.thread.is_alive(): self.thread.join(timeout=3) self.stop_thread() self.root.destroy() self.root.quit() for t in threading.enumerate(): if t != threading.current_thread(): t.join(timeout=3) if __name__ == '__main__': checker = EmailChecker() checker.run(){lamp/}安装克隆存储库或下载文件。确保计算机上已安装 Python。运行以下命令安装所需的库:pip install -r requirements.txt使用打开命令提示符或终端,导航到文件所在的目录。运行以下命令启动程序:python email_checker.py程序将打开一个 GUI 窗口。在“电子邮件”字段中输入您的电子邮件地址,然后单击“确定”按钮。单击“开始检测”按钮以开始监控系统状态。如果计算机处于唤醒状态并正在使用,程序将每 5 秒发送一封包含系统信息和屏幕截图的电子邮件。如果计算机处于空闲或睡眠状态,程序将不会发送任何电子邮件。要停止监控,请单击“停止检测”按钮。注意事项该程序使用 邮件服务器发送电子邮件。请确保您拥有一个邮箱账户或者邮箱服务器,并在 send_email 方法中提供正确的电子邮件地址和密码。该程序将电子邮件地址保存在名为 "emails.txt" 的文件中。请确保该文件与程序位于同一目录中。该程序使用 pyautogui 库进行屏幕截图。请确保您已安装该库并具有进行屏幕截图的必要权限。该程序使用线程在后台运行监控过程。stop_event 用于在用户单击“停止检测”按钮时停止监控过程。程序将在 GUI 窗口中显示输出消息。
-
使用 pyi-set_version 为 Python EXE 文件添加版本信息的方法 在开发软件时,为了方便用户了解软件的版本信息,我们通常会在软件的可执行文件(EXE 文件)中添加版本号等信息。而在 Python 开发中,我们可以使用 pyi-set_version 工具来为 EXE 文件添加版本信息。1. 要使用 pyi-set_version ,您需要先安装PyInstaller。您可以使用pip来安装它。在命Windows 终端(cmd)中输入以下命令:pip install pyinstaller2. 准备我们的 本版内容文件 可以引荐我之前的发布的模板 从 PyInstaller-pyi-grab_version 生成的可执行文件中提取版本信息3. 我们需要在 Windows终端 中进入您要添加版本的程序目录下,执行以下命令操作:pyi-set_version file_version_info.txt yourprogramname.exe打开程序的属性在详细信息就可以查看我们添加的版本信息了。
-
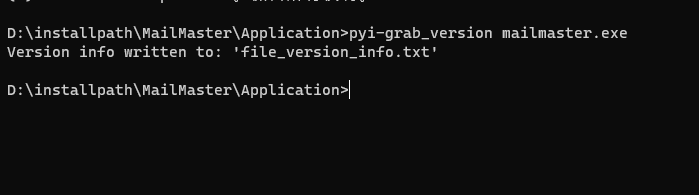
从 PyInstaller-pyi-grab_version 生成的可执行文件中提取版本信息 1. 要使用pyi-grab_version,您需要先安装PyInstaller。您可以使用pip来安装它。在Windows 终端(cmd)中输入以下命令:pip install pyinstaller2. 我们需要在 Windows终端 中进入您要获取版本的程序目录下,执行以下命令操作。pyi-grab_version yourprogramname.exe3.当命令执行完成后,会在目录下生成一个file_version_info.txt名称的文件。# UTF-8 # # For more details about fixed file info 'ffi' see: # http://msdn.microsoft.com/en-us/library/ms646997.aspx VSVersionInfo( ffi=FixedFileInfo( # filevers and prodvers should be always a tuple with four items: (1, 2, 3, 4) # Set not needed items to zero 0. filevers=(1, 0, 0, 0), prodvers=(1, 0, 0, 0), # Contains a bitmask that specifies the valid bits 'flags'r mask=0x16, # Contains a bitmask that specifies the Boolean attributes of the file. flags=0x0, # The operating system for which this file was designed. # 0x4 - NT and there is no need to change it. OS=0x40004, # The general type of file. # 0x1 - the file is an application. fileType=0x1, # The function of the file. # 0x0 - the function is not defined for this fileType subtype=0x0, # Creation date and time stamp. date=(0, 0) ), kids=[ StringFileInfo( [ StringTable( '080404b0', [StringStruct('CompanyName', 'Smilinghan'), StringStruct('FileDescription', 'Smilinghan-PC'), StringStruct('FileVersion', '1.0.0.0'), StringStruct('InternalName', 'Smilinghan-PC.exe'), StringStruct('LegalCopyright', 'Copyright (C) 2023-2023 by Smilinghan (nihaotang.com)'), StringStruct('OriginalFilename', 'Smilinghan-PC'), StringStruct('ProductName', 'Smilinghan-PC'), StringStruct('ProductVersion', '1.0.0.0')]) ]), VarFileInfo([VarStruct('Translation', [2050, 1000])]) ] )
-
爬取图片 爬取星巴克图片但是后面无法下载!from bs4 import BeautifulSoup import urllib.request import os url = 'https://www.starbucks.com.cn/menu/' try: response = urllib.request.urlopen(url) except: print("Error: 无法检索到 URL") exit() content = response.read().decode('utf-8') soup = BeautifulSoup(content, 'lxml') image_list = [(a.find('div', class_='preview')['style'].split('url("')[1].split('")')[0], a.find('strong').text) for a in soup.find_all('a', class_='thumbnail')] folder_path = os.path.join(os.getcwd(), "starbucks") if not os.path.isdir(folder_path): os.makedirs(folder_path) for url, name in image_list: try: urllib.request.urlretrieve(url="https://www.starbucks.com.cn" + url, filename=os.path.join(folder_path, name + '.jpg')) except: print(f"Error: 无法检索到 {name}")
-
Python爬取 淘票票信息 刚入手还没捂热的爬虫,如有不足的地方望大佬指点一番import urllib.request import json import re url = 'https://dianying.taobao.com/showAction.json?_ksTS=1683089742953_64&jsoncallback=jsonp65&action=showAction&n_s=new&event_submit_doGetSoon=true' headers = { 'accept':' text/javascript, application/javascript, application/ecmascript, application/x-ecmascript, */*; q=0.01', 'accept-language':' zh-CN,zh;q=0.9,en;q=0.8', 'cookie':' ', 'referer':' https://dianying.taobao.com/?spm=a1z21.3046609.city.222.32c0112alijvBz&city=441800', 'user-agent':' Mozilla/5.0 (Windows NT 10.0; Win64; x64) AppleWebKit/537.36 (KHTML, like Gecko) Chrome/112.0.0.0 Safari/537.36', 'x-kl-ajax-request':' Ajax_Request', 'x-requested-with':' XMLHttpRequest', } request = urllib.request.Request(url=url, headers=headers) response = urllib.request.urlopen(request) content = response.read().decode('utf-8') # 使用正则表达式提取 JSON 数据 match = re.search(r'\((.*)\)', content) json_data = match.group(1) # 将JSON数据写入文件 with open('D:\\taopiaopiao.json', 'w', encoding='utf-8') as fp: json.dump(json.loads(json_data), fp, ensure_ascii=False) # 从文件中加载 JSON 数据 with open('D:\\taopiaopiao.json', 'r', encoding='utf-8') as fp: obj = json.load(fp) # 打印演出名称和演出时间 for item in obj['returnValue']: print(item['showName'], ":", item['openDay'])
-